Welcome to the Block and Border Garden Gems Blog hop. I hope that this week you will join me, Sarah Furrer, and two of my fellow Certified Instructors as we share with you what we have created using Deb Tucker’s signature collection Garden Gems by Kathy Engle for Island Batik.
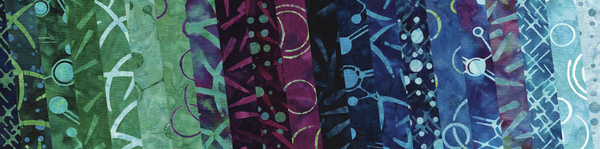
 The wonderful fabrics to pick from!
Each of us chose a Blockbuster block that we liked and then designed a pieced border that we wanted to add around the block. We all picked different blocks so you will see a variety of block and border combinations. How we approached adding a border to our chosen Blockbuster block is a great introduction to pieced borders as the process and steps are the same; it is just done on a larger scale when you are putting the pieced border on a larger quilt.
Garden Gems has been such a fun fabric collection to work with. There were so many fun bright options that it was hard to narrow down the choice and just pick the few I needed for my block. It took me a while but I finally narrowed it down to the three fabrics I felt would make a great block and border.

I started off by making Blockbuster 55 Astrolabe in the 16” block size. I thought that would give me a nice size block to work with and to plan a border around. I made the 8” Twisted Wedge Star block for the center using the Technique Sheet and my Wedge Star ® tool.


Fabrics for the Twisted Wedge Star Trimming the Pieced Diamond Point Completed Twisted Wedge Star Block
Using the Silver Technique Sheet, I made 4 Right Slant and 4 Left Slant units to create the frame around the Twisted Wedge Star block. I matched the Side Triangle to the Corner Triangles on my Wedge Star so that it would make an octagonal frame around the block. I thought that would really help the block pop, and it did.

Sliver Right and Sliver Left units
While I was making my Corner Beam units, I made four extra units because I knew I wanted to carry the Corner Beam element into my pieced border and thought that having them in the same color would make them tie in nicely to the center. I laid out the units for my block, checked to make sure that I liked the combination and then stitched the units together to finish the center block.


Corner Beam units Finished Astrolabe Block
Now the hard part, designing a border to go with it. As I mentioned earlier, I wanted to carry the Corner Beam design element out into the border. I laid out the extra 4” finished Corner Beam units with my block and said, this is a great start! With that decision made, I knew that my border width would be 4” finished. I decided that something simple would be best. The third fabric that I had picked and not used had such great colors and movement I thought it would make great Flying Geese.

Astrolabe Block with Corner Beams
What size Flying Geese did I pick? Well, let me tell you how I got there. I knew I had 16” of length to work with since it was a 16” block and because I had already decided to put the 4” Corner Beams in the corners, I had 4” in height.
So, the space for my flying geese was 16” by 4”. I could use 4” x 8” flying geese but those seemed too large for me and it didn’t create an interesting design. The other option was to use 2”x 4” Flying Geese, and 16” does divide by 2” nicely so I decided to make 2”x 4” Flying Geese.


Fabric chosen for Flying Geese. Trimming the Flying Goose unit to size.
By dividing 16” by 2” I knew I would need 8 Flying Geese per side. With 4 sides to the block, I would need a total of 32 Flying Geese made from that third fabric. Once my geese were done, I laid them out with my Corner Beams to see what it would look like. Once arranged I felt that the Corner Beam unit in the teal fabric just disappeared in to the border. So I went back and made 4 new Corner Beam units using the same Dark Purple from the center. With them in place I thought that the corners popped nicely, but the flying geese just sort lacked the punch I was looking for. I liked the layout that I had, just not the colors so I went back to the drawing Board. I decided to make the Flying Geese scrappy, and picked 3 new colors. I made 8 geese from each.


Border with Teal Corner Beams. Border with Dark Purple Corner Beams. New Flying Geese colors.
Once I had the new Flying Geese, I was much happier. The only thing left to decide on was which 8 Flying geese I would use from the previous 32. The original fabric that I picked had so much color variation in it I needed to decide which of the Flying Geese would work best with my new ones. I decided to keep the ones that had more pink so that they would stand up against the teal that they would sit next to.


I sewed my Flying Geese together into a row so that 4 would be pointing in from each side and the geese would kiss in the center. Once all sewn together, I laid everything out to make sure that I liked how it looked.


Flying Geese row almost finished. Center block and units all laid out.
Well once the purple Corner Beams were in place, I knew I didn’t like them. They blended in with the flying geese that they touched, I tried rotating them but that didn’t help. So out came the teal Corner Beam units that I had set aside earlier. Once they were in place, I really liked what the block looked like.


Rotated Purple Corner Beams. Teal Corner Beams.
I stitched the pieces together into rows and then stitched the rows together to make my block. It finishes at 24”, which is a great table topper, wall hanging, or center of a medallion quilt if you want to take it further.

Finished Astrolabe block with pieced border.
As you can see creating a pieced border to go around a block or even a quilt can be a process of trial and error. In the end I had a pile of units that I wasn’t using but that didn’t matter to me because I had fun making the project and the final outcome was well worth the effort. Often I will color my designs on the computer to take some of the guesswork out of the process. But I love to sew, so this time I just decided to make the units I thought I’d need and adjust as I went. I’m really happy with the result!
Join us for a week full of new ideas on how to expand your blocks. Be sure to visit the other participants this week and see what they have to share with you.
Tuesday, April 27th
Diana Mann at http://murgabooquilts.com/
Wednesday April 28th
Chris Combs at https://www.facebook.com/thequiltersnookindiana
Thursday April 29th
Sarah Furrer at https://deb-tuckers-studio-180-design.myshopify.com/blogs/news