
Today's post is written by Sue Tucker, our CFO and quilting enthusiast who has been a part of things here since the beginning of Studio 180 Design.
Last time, I talked about making and adding big stars to your OBWs. This time I want to talk about a few simple ways to give your stars even more pizazz.
This quilt is one I did with another of our Certified Instructors, Sarah Furrer. She had the fabric and made the hexagons. She also made a big star and a bunch of Star 60 units for the smaller stars. Then she turned it over to me to design. This was a fun, happy quilt to work on, and I really enjoyed figuring out where to place the stars among the hexagons.
The hexagons in this quilt finished to 6”, so the small stars were made up of 3” Star 60 Units, finishing to 6”, and the big star was made of 6” Star 60 units, finishing to 12”.
First, I’d like to talk about the small stars. They were constructed using the basic instructions I covered in the first blog post. I put 8 into this quilt, all using the black border fabric for the side triangles. For the diamonds, Sarah had selected fabrics that read as solid and coordinated with the fabric used in the hexagons. Each small star was constructed with two different colored diamonds. Those two colors coordinated with the surrounding area to provide a smooth transition. One star ended up in a corner to add a pop of the unexpected.
For the big star, Sarah added loads of interest by using four different colored strips in the diamonds. She selected four of the fabrics that she had used in the small stars. She cut them into strips, sewed them together lengthwise, and then used that strip set for her diamonds.

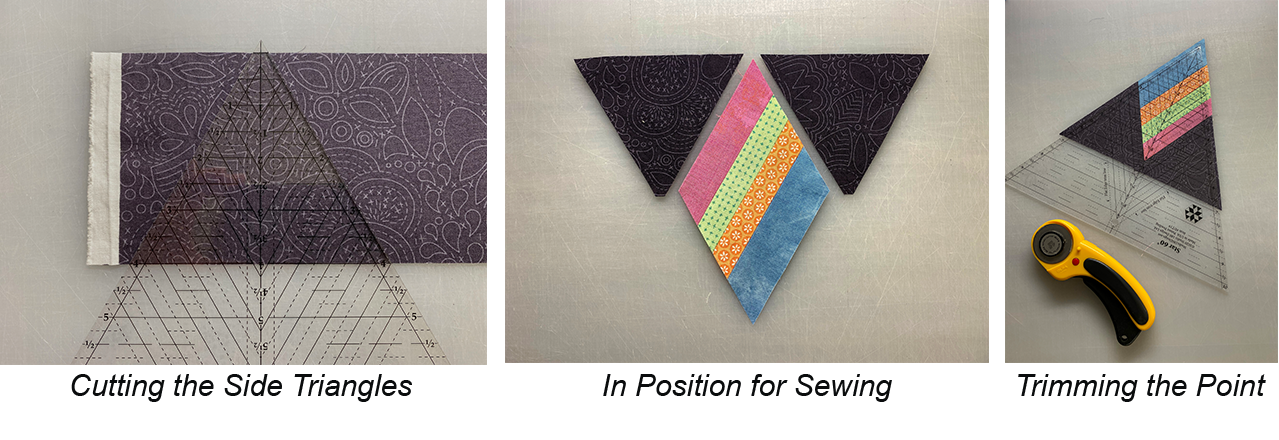
When you are doing diamonds with multiple strips like this, the challenge is figuring out how wide to cut your strips. You have to end up with a strip that’s at least the size of the Diamond Strip width in the chart for the size unit you are making. So for the 6” Star 60 units Sarah made, she needed her strip set to be at least 3¾” wide. It’s simplest to use varying strip widths for this, otherwise there’s a bit of math and/or trial and error involved to get approximately even strip sizes in the final star. Of course, not one to do things the easy way, Sarah decided she wanted her four strips to be the same width in the final unit. She knew three would be the same size and the fourth needed to be ¼” wider to accommodate the trim. With a bit of figuring and some trial and error, she decided to cut the narrow strips 1¼” and the wide one 1½”. When sewn together they would produce a strip 3¾” wide. Perfect!

To sew the strips together, Sarah first positioned them in the order desired, making sure the widest strip was at the bottom. Then she staggered the ends, so when the first cut was made she wouldn’t cut off as much fabric. She pressed the seams open to reduce bulk, then cut the diamonds. Because of the stagger, the method of making the first cut as described in the instructions doesn’t work as well as usual, but if you rotate the strip so it’s vertical, you can align the Star 60 Tool on the left edge of the strip and make that first cut. The diamonds were cut using the 7” guideline on the tool, as noted in the chart for a 6” Star 60 unit. You can find the chart in the instruction set that comes with the Star 60.

The side triangles were cut from 4” strips of border fabric, and then the Star 60 units were constructed and trimmed. When you’re positioning the side triangles and diamonds, you’ll want to keep the wide strip of the diamond on the lower right, so it’s in the correct position to trim later. Once you create and trim your Star 60 units, you’ll sew them into two half hexagons.

During the design process, I left open spaces for the small stars since I didn’t know what color diamonds I wanted in each spot. I used the big star as I worked on the layout just like you would any hexagon. There was overlap in some places between it and the small hexagons, but I expected this and knew I could take care of it later. Once I was happy with the final layout, I decided what color diamonds I wanted in each small star. I made the small corner star early to get an idea what it would look like in that position.
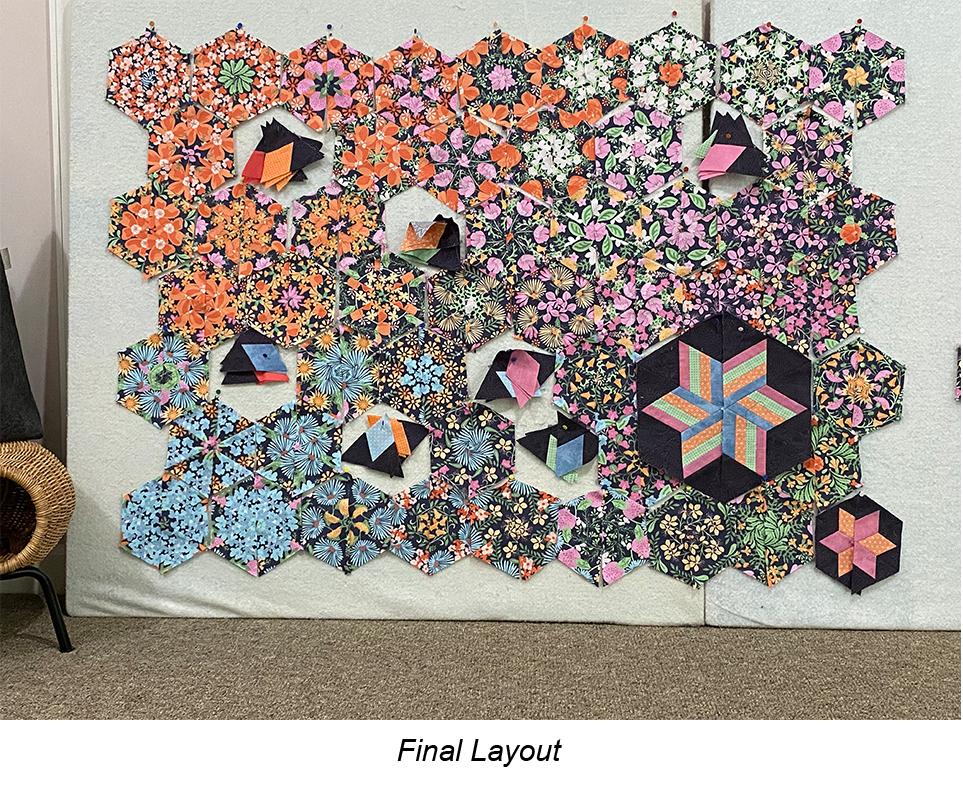
Then I cut the half hexagons to put in the last row. At this point, I decided to make a few minor layout changes, so the initial corner star ended up in the middle, with a different star in the corner. I’ve found this to be part of my normal OBW design process – tweeking the hexagons until the final moment... LOL!

Next I constructed the rest of the small stars.
At this point I was just about ready to sew the rows together, but before I did, I wanted to get the hole under the big star the right shape. I just needed to remove one triangle from each of the two half hexagons at the top center, and two triangles from each of the half hexagons at the bottom to create the lower left and right corners.

In sewing together the rows, you sew in the small half stars as if they were plain half hexagons. To sew in the big star, you sew together the rows above the half stars, and the rows below the half stars, then sew them to the big half star.

And here’s the finished quilt again. Remember, all of the instruction on how to make the basic star is contained in the Instruction Set that came with your Star 60 tool, and that there are also videos available on our website and YouTube channel that step you through the process.

I hope you’re enjoying this series on using the Star 60 with OBWs. Next time I have an even more dramatic star I’m adding to an OBW. I can’t wait to share that one with you! See you then!
To see other examples of using Star 60 stars in OBWs, you can check out the blog of one of our Certified Instructors, Jackie OBrien, who is also well known in the OBW world. Jackie has written about two OBWs that she has done with stars. One is called “OBW 76 – A Prickly Situation” and the other is “OBW # 78 – The Road to Oz” You can find her blogs at “If these Threads Could Talk”, where she also provides loads of other great information about the OBW process. She also has information there on other Studio 180 tools and some of her own patterns, too, so it’s a great all-around resource.
Another great resource on OBWs is an exceedingly well moderated FaceBook group called “One Block Wonder Quilt Forum” with over 25,000 members that is chock full of well organized, useful information and tips. Their members are always ready to help you when needed and share your excitement about your successes. I strongly encourage any of you interested in trying OBWs to join and check out that page. It’s full of inspiration, information, and community. In fact, they just posted a challenge that goes through May and it's all about adding stars to OBWs. So this is the perfect time to put that Star 60 to work in an OBW (or maybe even your Wedge Star with an octagon OBW!). Definitely something to think about!
I hope you are excited to try using your Star 60 with OBWs. If you need to pick up a Star 60, you can find them at your local quilt shop or on our website, here. We’d also love to see the OBWs you create with stars, and encourage you to post their photos on Instagram with the hashtag #studio180star60obw.
See you in about a week for Part 4, the conclusion of this series, but still just the start of our experiments into the wide range of Star 60 designs we can add to OBWs. I really hope many of you choose to come along with us on this journey!

When Deb designed our new First Choice rulers this type of unit was what she had in mind. So let's see how you can use your new First Choice rulers to make Geese on the Edge.


