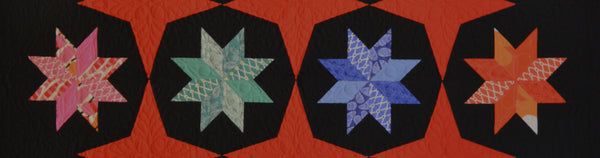
In my last blog, I talked about the basics of making stars with Studio 180 Design’s Star 60 tool to incorporate into a One Block Wonder (OBW). This time I’m going to talk about my first OBW and the double-sized stars I included in the design. I used a different sort of method to cut my side triangles so they would blend with the surrounding hexagons, so I’ll share that, too.
When we started talking at Studio 180 about putting Star 60 stars in OBWs, I hadn’t finished an OBW. I’d had one in process at the half-hexagon phase for a while, but hadn’t found the time to finish it. Now I think it was just biding its time, waiting for this moment. I pulled it out, got ready to start, and BAM! I realized my hexagons were going to finish at 5½”, which meant I’d need to use a 2¾” Star 60 unit. Well, the Star 60 doesn’t make ¾” units, it makes whole and half inch units. It didn’t take me too long to realize that if I made my stars twice as big, I could get them to work with the half hexagons I had. Perfect! I would make 5½” Star 60 units, which would make 11” stars, and those would fit into this quilt. I wasn’t sure at this point how I was going to do that, but knew it would work.

I didn’t start by making the stars, though, because I didn’t know where they were going to go and I knew I wanted the diamonds and side triangles to coordinate with the area surrounding the star. So I started the design process with the original hexagons to see how they “spoke to me”. As I arranged and rearranged, I tried to keep the spaces I’d need for the stars open and tried to position them in a pleasing way. I ended up with three distinct areas – one in the upper left that was heavy on gold, one going diagonally from the upper right to lower left that had a more open design so you could see more of the black background, and one in the lower right that had more red and green. I decided I wanted to put a black star in the gold area, a gold star in the black area, and a red star in the red and green area. I had the perfect fabrics in my stash, so grabbed those and was off to the races!

Now to get those holes for the stars the right size. You can see in the picture I separated one of the half hexagons on both sides to get the width I needed for the double sized star. I took each half hexagon and removed one triangle. These pieces fit perfectly into the spaces that needed filling in order to create the large hexagon shaped hole. The single triangles went at the top, and the doubles fit at the bottom. Since they came from the hexagons that were already there, they coordinated perfectly. Viola!

Making the stars was next. I cut the six diamonds from my three fat quarters like I described in the last blog. I used my instruction set and used the information in the chart for 5½” Star 60 units. I had to pin them on the design wall to see how they looked. I liked it!

Next came another interesting part. If you recall, last time I talked about cutting the side triangles starting with a strip and using the Star 60 to make the cuts.

But for this quilt, I wanted the side triangles of the stars to blend with the area around it so the star would seem to be floating on the OBW. Cutting from strips wouldn’t necessarily give me the exact triangles I was looking for. I had extra fabric left over, so decided to use that to fussy cut the side triangles. I used the line on the tool that corresponded to the strip size in the chart to do my fussy cutting – 3¾”. I just cut triangles and didn’t worry about the flat tip that you get when you cut from a strip. To adjust for this, when I was stitching the side triangle to the diamond, I just aligned the triangle so about ¼” of the point was showing and my stitching started in the “valley” between the two pieces. Since I knew that everything was oversized to be trimmed later, I knew this would work out perfectly.

When fussy cutting, it does take a lot of fabric and you end up with something that looks like swiss cheese.

The basic construction of the Star 60 units and star is just like I described in the previous blog, with the exception of the alignment of the side triangle that I talked about above, so I won’t spend time here on that. I did use number pins to keep everything organized so I could be sure everything ended up in the right place.

Sewing the Star 60 units into half hexagons came next as described in the previous blog. Then it was time to construct the individual rows.

To get the stars sewn into the rows, I needed to sew the rows above and below the half stars together first, then stitch the partial rows together. Then I could sew that double row to the big half star hexagons.

Here’s the top almost done.
Unfortunately, I haven’t been able to get any further on this one because I need more of the black fabric for a narrow border. I know it’s a Peppered Cotton, but not the exact one. I have it narrowed down to two at this point, so I’m closing in on it! I know what you’re thinking. You had way more than enough fabric to fussy cut the side triangles and then ran out of fabric for the border? Yup! Story of my life!
Next time, I’m excited to show you another OBW that uses both small stars and a bigger, fancier one than today’s.
To see other examples of using Star 60 stars in OBWs, you can check out the blog of one of our Certified Instructors, Jackie OBrien, who is also well known in the OBW world. Jackie has written about two OBWs that she has done with stars. One is called “OBW 76 – A Prickly Situation” and the other is “OBW # 78 – The Road to Oz” You can find her blogs at “If these Threads Could Talk”, where she also provides loads of other great information about the OBW process. She also has information there on other Studio 180 tools and some of her own patterns, too, so it’s a great all-around resource.
Another great resource on OBWs is an exceedingly well moderated FaceBook group called “One Block Wonder Quilt Forum” with over 25,000 members that is chock full of well organized, useful information and tips. Their members are always ready to help you when needed and share your excitement about your successes. I strongly encourage any of you interested in trying OBWs to join and check out that page. It’s full of inspiration, information, and community.
I hope you are excited to try using your Star 60 with OBWs. If you need to pick up a Star 60, you can find them at your local quilt shop or on our website, here. We’d also love to see the OBWs you create with stars, and encourage you to post their photos on Instagram with the hashtag #studio180star60obw.
See you in a few days for Part 3!